Create a mapped ROM
From MSX Game Library
To create cartridges larger than 64 KB, MSXGL allows to use 4 types of ROM mappers.
Principles
A mapped ROM is visible in pages 1 and 2 of the Z80 memory space (address 4000h-7FFFh and 8000h-BFFFh).
This 32 KB space is divided into either 4 banks of 8 KB or 2 banks of 16 KB.
This is why mappers are often categorized as 8 KB mapper and 16 KB mapper.
ROMs using these mappers can be for example 128 KB, 256 KB, 512 KB, 1 MB, 2 MB or 4 MB in size (4 MB, only for 16 KB mapper).
The total content of the ROM is divided into blocks of the mapper size (8 or 16 KB). These blocks are called segments.
The concept of using mappers is to associate a given segment with a bank to make it visible to the Z80.
By changing the segments visible in each bank during the course of the program, we can thus access the entire contents of the ROM.
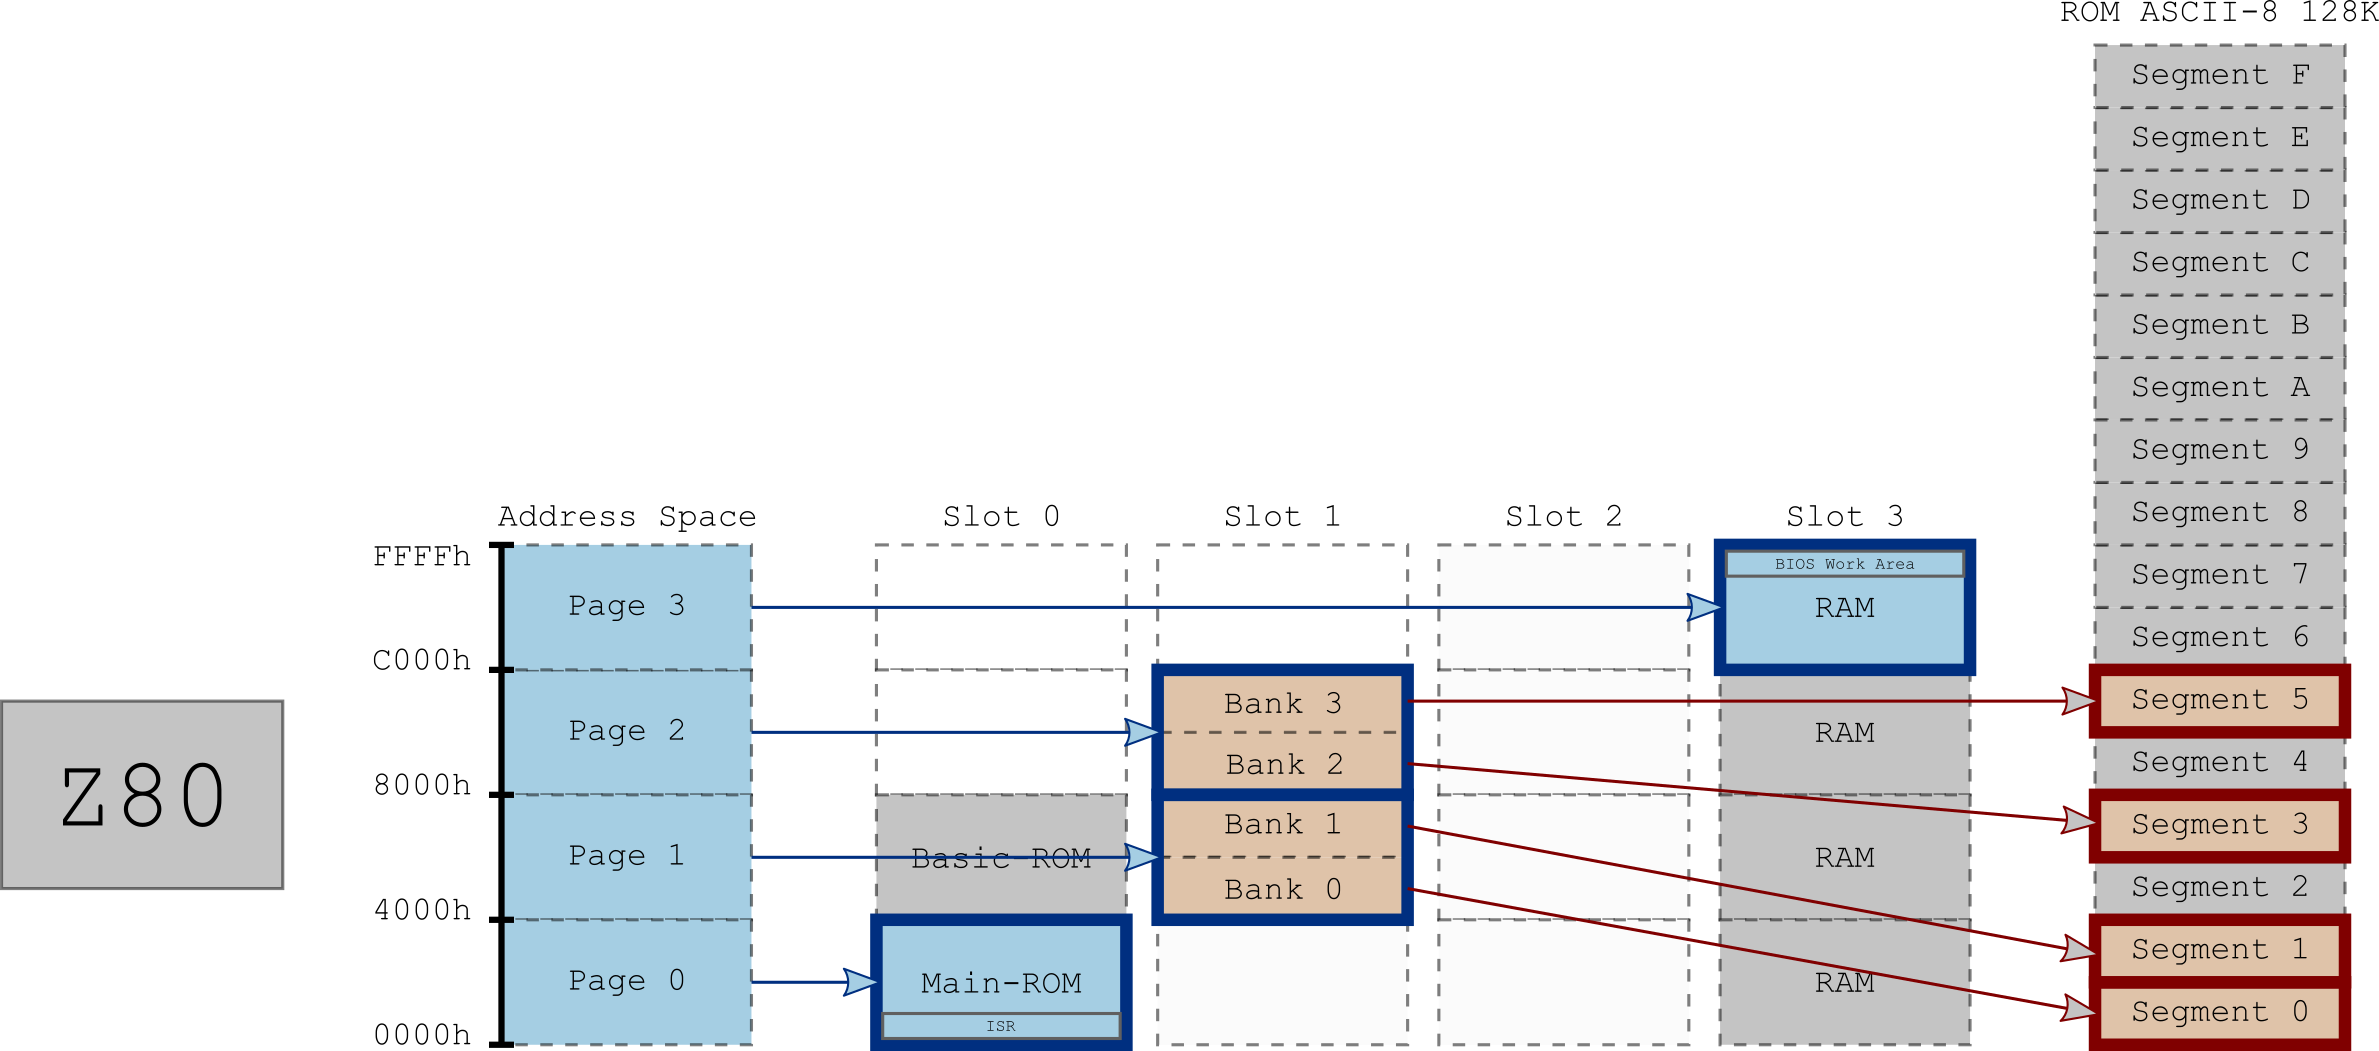
128 KB ROM using an 8 KB mapper (ASCII-8) in slot 2. The ROM is composed of 16 segments, visible to the Z80 through 4 banks. In the example above, segment #0 is visible in bank #0, segment #1 in bank #1, segment #3 in bank #2 and segment #5 in bank #3.
To change the visible segment in a bank, you just have to write the segment number to a given address (different depending on the mappers).
Write in a ROM, yes, you read it right!
In fact, mapped ROMs have special mechanisms (mappers) that intercept write signals at certain addresses and use the written value to select the segment.
Using MSXgl, you don't need to know the addresses or write because you only need to use the SET_BANK_SEGMENT(bank, seg) macro which takes care of associating a segment to a bank.
The supported mappers are:
| Target | Description |
|---|---|
| ROM_ASCII8 | ASCII-8: 8 KB segments for a total of 64 KB to 2 MB |
| ROM_ASCII16 | ASCII-16: 16 KB segments for a total of 64 KB to 4 MB |
| ROM_KONAMI | Konami MegaROM (aka Konami4) 8 KB segments for a total of 64 KB to 2 MB |
| ROM_KONAMI_SCC | Konami MegaROM SCC (aka Konami5): 8 KB segments for a total of 64 KB to 2 MB |
More details on the different mappers:
Note: "MegaROM" refers to a ROM of 128 KB or more. Even though they are not widely supported, there is nothing to prevent you from creating a 64 KB ROM using a mapper. We therefore prefer to use the term Mapped ROM here rather than MegaROM.
How to
Setup
First, you need to decide which mapper you want to use and what size you need.
If you have no idea, start with a 128 KB ROM using ASCII-8 mapper.
The choice of ROM is made in the configuration file of the build tool (build.bat).
Example:
set target=ROM_ASCII8
set ROMSize=128
See the details of the configuration of the Build Tool: Targets#Mapped_ROM_program.
Example
A sample program (s_mapper) is available to demonstrate the use of ROM mappers.
In this example, we create a 128 KB mapped ROM in ASCII-8 format (16 segments). The first 4 segments are defined in the main program and 2 others in separate files.
Sample files:
- projects/
- samples/
- s_mapper.c (main program)
- s_mapper.cmd (build tool configuration)
- s_mapper_s4_b2.c (segment #4 C source)
- s_mapper_s5_b3.asm (segment #5 assembler source)
- samples/
In the Build Tool:
- s_mapper.c will be compile as a 32 KB plain ROM (which represents the first 4 segments).
- Then, the Build Tool will search for source files for segment #5 to #15 starting with s_mapper_. 3 files extensions are supported: .c, .asm and .s.
- s_mapper_s4_b2.c will be find, compile and added to link list.
- s_mapper_s5_b3.asm will be find, compile and added to link list. Assembler segment source file must include the .area directive with the segment name _SEG{num} (_SEG5 here).
- All the source will be linked together (and symbols will be "resolved").
- The final binary file will be create by MSXhex, putting each segment at its final location in the ROM.
Symbols
Segment symbols (tables or functions name) can be accessed from any other sources.
No more need to know the address of a data in a segment of the mapper; it is enough to call it by its name (which also allows the C compiler to validate the data type).
It is therefore also much easier to accumulate data in a segment since it is only necessary to put the data one after the other; the address of the arrays being resolved at link time.
The switching of the segments remains the responsibility of the programmer.
Example:
// Segment #5 (bank #3)
u8 MyData[] = { 1, 2, 3 };
// Main program
extern u8 MyData[];

SET_BANK_SEGMENT(3, 5);
u8 s = MyData[1];
Banked call
SDCC banked calls (using the __banked directive) can be used to call a function in a segment and have an automatic bank switching to this segment before call, and then, a restoration of the previous segment after function returns. The only limitation is that SDCC only returns the segment number (and not the bank number) to the default trampoline functions. So, to make it simple (and efficient), MSXgl only allow (for the moment) a switch on one of a mapped-ROM's bank.
- For 8 KB mapper : bank #2 (8000h-9FFFh)
- For 16 KB mapper : bank #1 (8000h-BFFFh)
To activate this feature, you need to add set BankedCall=1 in your "build.bat".
Example:
// Segment #7 (bank #2)
u8 LocalFunc() { return 2; }
u8 BankedFunc() __banked { return LocalFunc()+1; };
// Main program
u8 BankedFunc() __banked; // Prototype (can be in a .h file)

BankedFunc(); // automatic switch to segment #7 then restore previous segment
Advice
The simplest way to start with mapped-ROM is to use a 8 KB mapper (ASCII-8 for example) and to keep the first 3 segments always visible from the first 3 banks (the initial state), and then use the last bank (#3) to switch between all other segments.
This allows to have a 24 KB program (3 segments) always visible by the Z80 and to switch only the segments that contain the data, when needed.
Let's say you have a 24 KB (segment #0, #1 and #2) program and 3 data segments containing: sprites (segment #4), background tiles (segment #5) and music (segment #6).
Your pseudo code could be something like this:
...

// Init VRAM data
SET_BANK_SEGMENT(3, 4); // Segment #4 visible through bank #3
LoadSpriteInVRAM();

SET_BANK_SEGMENT(3, 5); // Segment #5 visible through bank #3
LoadTilesInVRAM();

...

// Main loop
while(1)
{
    WaitForVSynch();
    SET_BANK_SEGMENT(3, 6); // Segment #6 visible through bank #3
    PlayMusic();

    ...
}
To go further, the next step could be, for example, to use bank #2 (the third one) to put specific code that doesn't need to be always visible by your main program.
For example, the music player could be in a segment and switch to bank #2 only when you need to decode a music frame.