Difference between revisions of "Modules/game pawn"
From MSX Game Library
< Modules
(→Define pawn's sprites) |
|||
| (21 intermediate revisions by the same user not shown) | |||
| Line 1: | Line 1: | ||
| − | + | {{MODULE | |
| − | + | |name=game_pawn | |
| − | + | |category=Gameplay | |
| − | + | |image=raw.githubusercontent.com/aoineko-fr/MSXgl/main/engine/doc/img/sample_game.png | |
| − | + | |dependency1=vdp | |
| − | + | |dependency2=memory | |
| − | + | |dependency3= | |
| − | + | |sample1=s_game | |
| − | = | + | |sample2= |
| − | + | |sample3= | |
| − | + | }} | |
| − | |||
| − | |||
| − | |||
| − | |||
| − | |||
| − | |||
| − | |||
| − | |||
| − | |||
| − | |||
| − | |||
| − | |||
| − | |||
| − | |||
| − | |||
| − | |||
| − | |||
| − | |||
| − | |||
| − | |||
| − | |||
| − | |||
| − | |||
| − | |||
| − | |||
| − | |||
| − | |||
| − | |||
| − | |||
| − | |||
| − | |||
Latest revision as of 01:02, 13 January 2024
The game_pawn module handle character animation, rendering, collision and physics.
This module offer several structures the user can use to configure a pawn (a player, an enemy or any moving object) for rendering (multi-layers and flip/flap) and movement.
Once the pawn has been configured, functions can be used to change its state (action, position, etc.) and an update function can be used to apply these changes and display them on the screen.
Contents
Usage
To use this module, include "game_pawn.h" in your source code, and add "game_pawn" to the modules list (LibModules) in your project's configuration file (project_config.js).
Define pawn's sprites
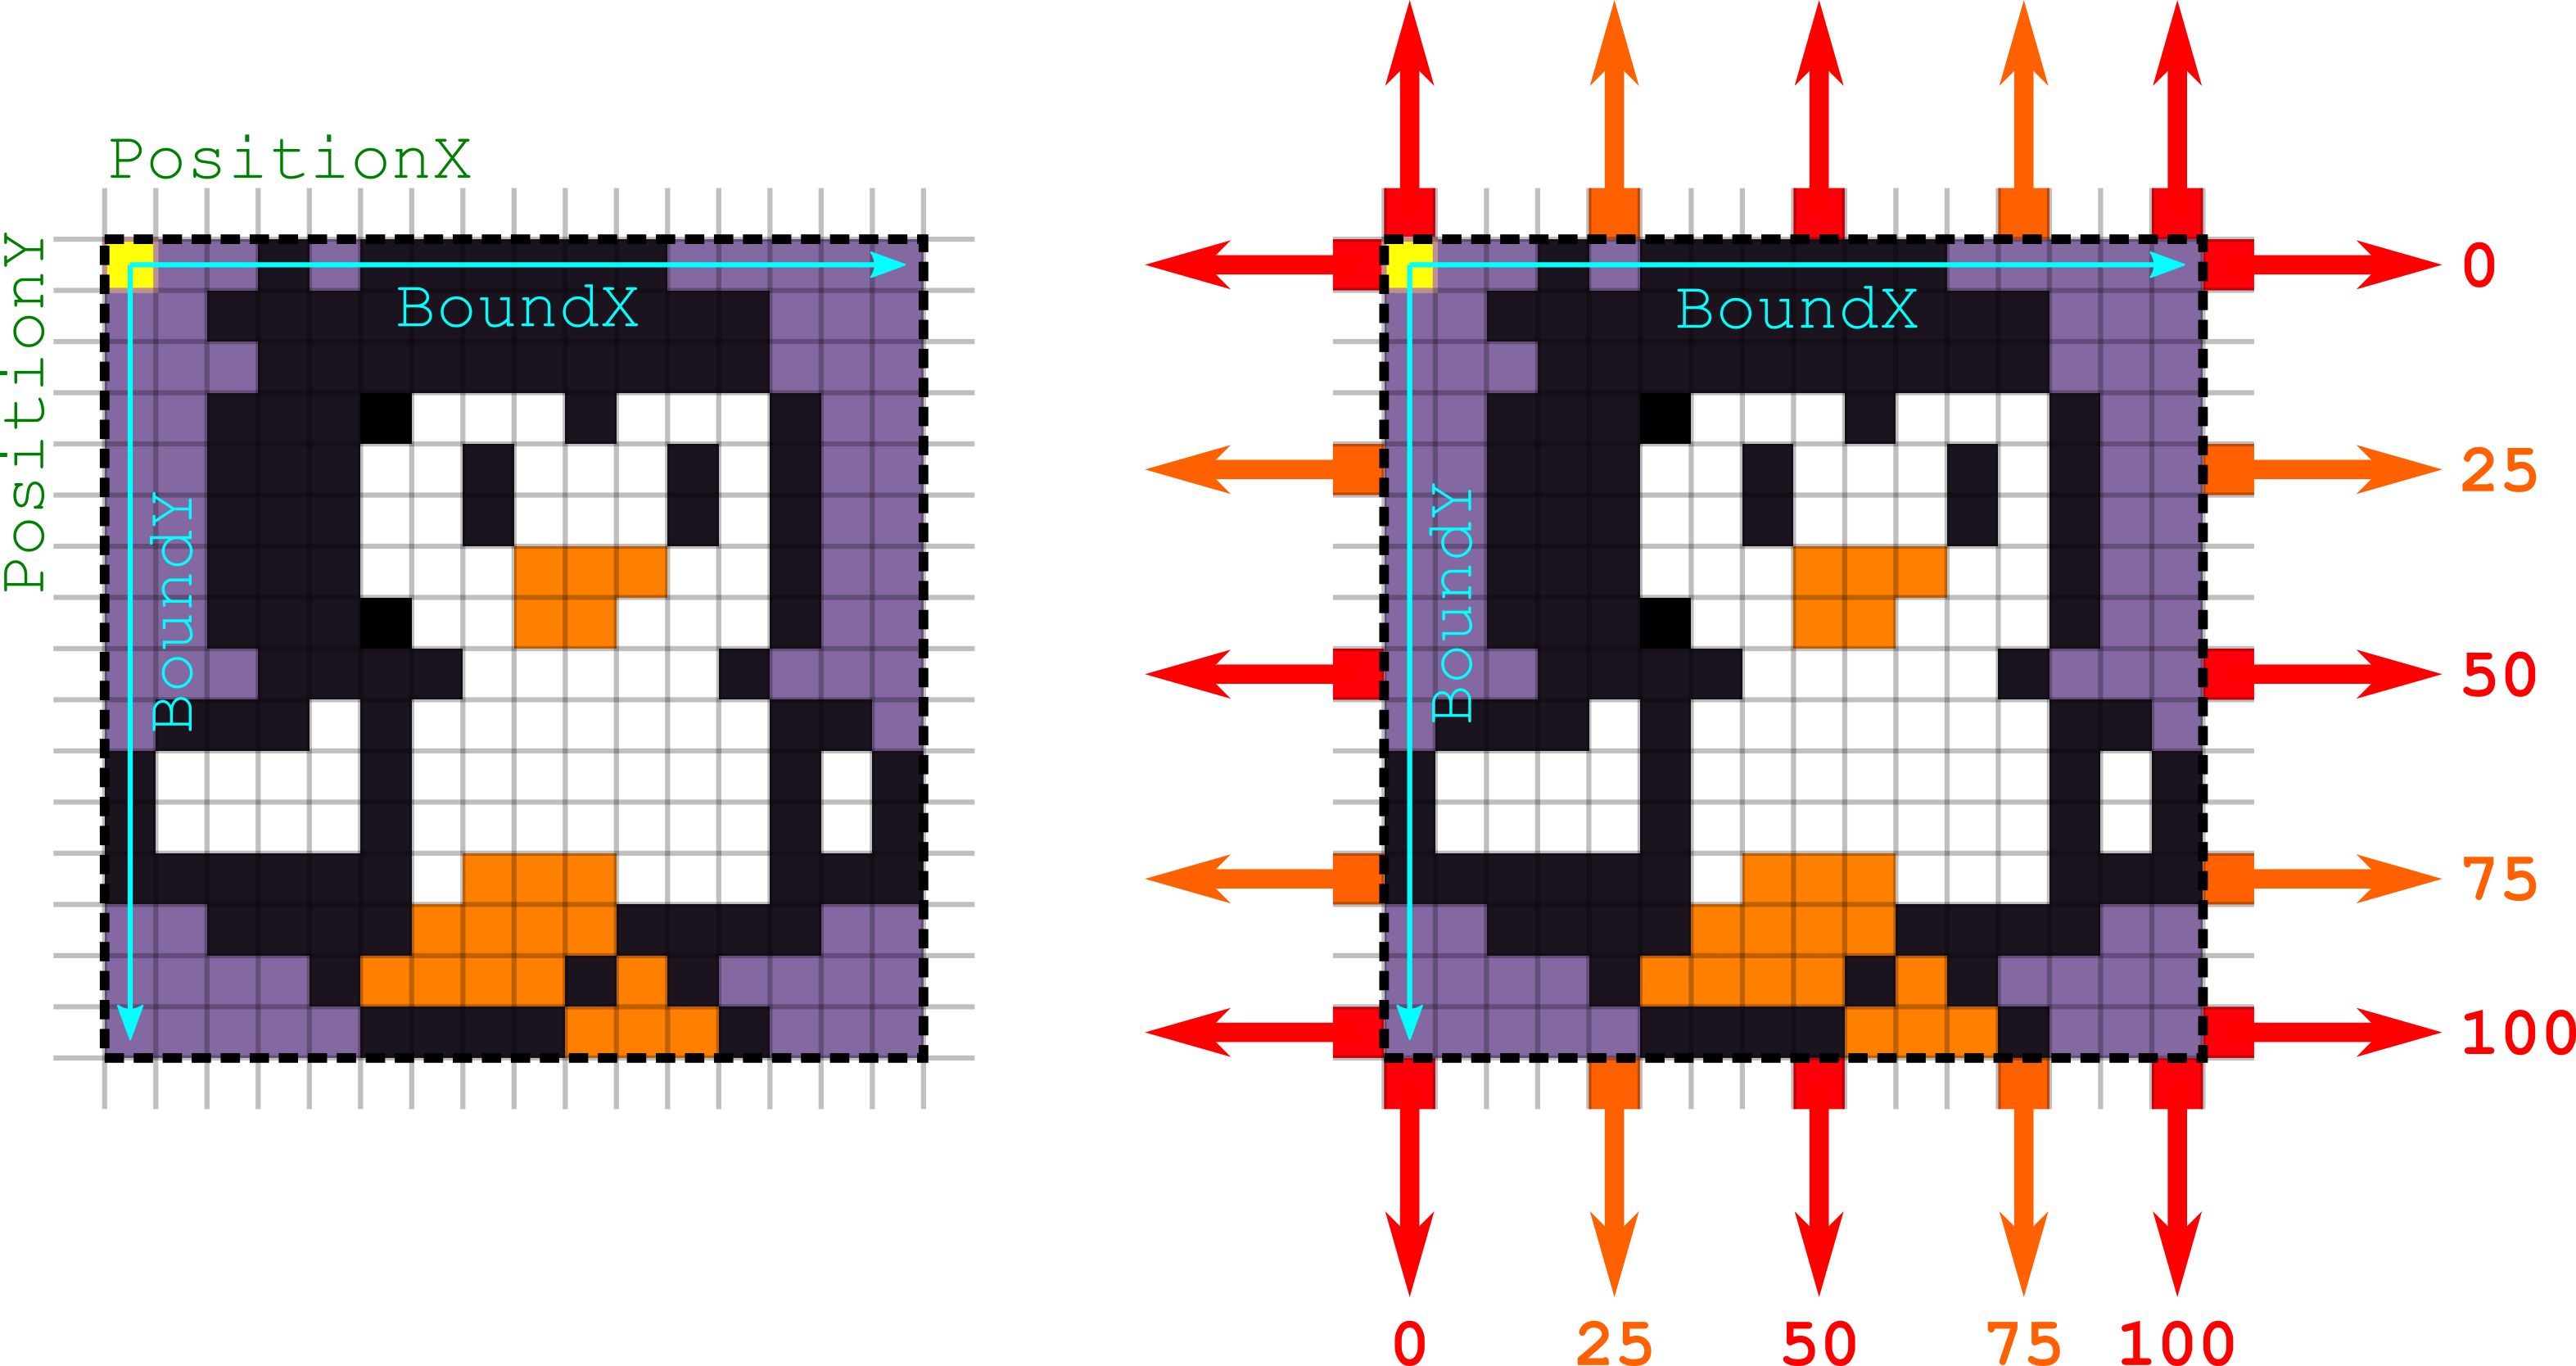
The visual of a pawn is defined by one or more sprite layers. The Game_Sprite structure allows to define the parameters of each layer : The X/Y offset of the layer relative to the Pawn position, the pattern number offset from the pattern number defined in the animation, the sprite color and a special flag for display.
Example:
A two color sprite (2 layer): const Game_Sprite g_SpriteLayers[] =
{
{ 0, 0, 0, COLOR_WHITE, 0 }, // Sprite position offset: 0,0. Pattern offset: 0. Color: White. No special flag
{ 0, -8, 4, COLOR_GRAY, 0 }, // Sprite position offset: 0,-8. Pattern offset: 4. Color: Gray. No special flag
};
Define pawn's animations
Each animation is defined by a list of Game_Frame structures that determine : The pattern number of the animation frame, the duration of the frame in number of display cycles, and a function to call when the character reach a given frame of the animation. Create a structure for each animation. You have to provide a complete list of all action that the pawn can do.
Example:
Push animation with function to trigger const Game_Frame g_FramesPunch[] =
{
{ 0, 4, NULL}, // Display pattern 0 for 4 render cycles
{ 8, 4, NULL},
{ 8, 1, DoPunch }, // call function DoPunch() when Pawn is displaying this frame
{ 16, 4, NULL },
{ 24, 4, NULL },
};
Define pawn's actions
An action is defined in the Game_Action structure and include a animation plus some parameters like the looping of the animation or a flag to determine if the action can be interrupted.
Examples: const Game_Action g_AnimActions[] =
{ // Frames Number Loop? Interrupt?
{ g_FramesIdle, numberof(g_FramesIdle), TRUE, TRUE },
{ g_FramesMove, numberof(g_FramesMove), TRUE, TRUE },
{ g_FramesJump, numberof(g_FramesJump), TRUE, TRUE },
{ g_FramesPunch, numberof(g_FramesFall), FALSE, FALSE }, // Play once, can't be interrupted
};
Initialize pawn
All pawn management is carried out via a Game_Pawn structure (each pawn must have its own structure). Once the sprite and animation data have been defined, the pawn must be initialized.
Examples: GamePawn_Initialize(&g_PlayerPawn, g_SpriteLayers, numberof(g_SpriteLayers), 0, g_AnimActions); // Initialize pawn structure GamePawn_SetPosition(&g_PlayerPawn, 16, 16); // Set pawn position
Initialize pawn
If you want to use the physics and collision functionalities, you must set the GAMEPAWN_USE_PHYSICS option in your library configuration file (msxgl_config.h). Next, you need to define two callback functions:
- one that determines whether a given block of background is a blocker or not,
- and the other which receives collision-related events (touching the screen edge, falling, etc.).
// Physics callback
void PhysicsEvent(u8 event, u8 tile)
{
switch(event)
{
case PAWN_PHYSICS_BORDER_DOWN:
case PAWN_PHYSICS_BORDER_RIGHT:
case PAWN_PHYSICS_COL_DOWN: // Handle downward collisions
case PAWN_PHYSICS_COL_UP: // Handle upward collisions
case PAWN_PHYSICS_FALL: // Handle falling
break;
};
}
// Collision callback
bool PhysicsCollision(u8 tile)
{
return (tile & 0x80);
}
/* ... */
GamePawn_InitializePhysics(&g_PlayerPawn, PhysicsEvent, PhysicsCollision, 16, 16); // Initialize pawn physics
Samples
See module use cases in the sample programs:
Settings
Library configuration (msxgl_config.h):
// GamePawn setting
#define GAMEPAWN_ID_PER_LAYER		TRUE	// Set sprite ID for each layer (otherwise set per pawn)
#define GAMEPAWN_USE_PHYSICS		TRUE	// Add physics and collision features
// Pawn's bound (can be fixed for all pawn, or setable for each one)
#define GAMEPAWN_BOUND_X			16
#define GAMEPAWN_BOUND_Y			16
// Collision position options for each pawn's side
// - GAMEPAWN_COL_0
// - GAMEPAWN_COL_25
// - GAMEPAWN_COL_50
// - GAMEPAWN_COL_75
// - GAMEPAWN_COL_100
#define GAMEPAWN_COL_DOWN			(GAMEPAWN_COL_25|GAMEPAWN_COL_75)
#define GAMEPAWN_COL_UP				GAMEPAWN_COL_50
#define GAMEPAWN_COL_RIGHT			GAMEPAWN_COL_50
#define GAMEPAWN_COL_LEFT			GAMEPAWN_COL_50
// Options to determine which border collide or trigger events
// - GAMEPAWN_BORDER_NONE
// - GAMEPAWN_BORDER_DOWN
// - GAMEPAWN_BORDER_UP
// - GAMEPAWN_BORDER_RIGHT
// - GAMEPAWN_BORDER_LEFT
#define GAMEPAWN_BORDER_EVENT		(GAMEPAWN_BORDER_DOWN|GAMEPAWN_BORDER_LEFT|GAMEPAWN_BORDER_RIGHT)
#define GAMEPAWN_BORDER_BLOCK		(GAMEPAWN_BORDER_UP|GAMEPAWN_BORDER_DOWN|GAMEPAWN_BORDER_LEFT|GAMEPAWN_BORDER_RIGHT)
// Top/bottom border position (in pixel)
#define GAMEPAWN_BORDER_MIN_Y		0		// High border Y coordinade
#define GAMEPAWN_BORDER_MAX_Y		184		// Low border Y coordinate
#define GAMEPAWN_FORCE_SM1			FALSE	// Force the use sprite mode 1 (for MSX2)
#define GAMEPAWN_USE_VRAM_COL		TRUE	// Use VRAM to chech tile collision (use RAM buffer instead)
#define GAMEPAWN_TILEMAP_WIDTH		32		// Width of the tiles map
#define GAMEPAWN_TILEMAP_HEIGHT		24		// Height of the tiles map
Note: For now, GAMEPAWN_COL_UP, GAMEPAWN_COL_RIGHT and GAMEPAWN_COL_LEFT are fixed to GAMEPAWN_COL_50.

Dependencies
Dependency on other modules:
Documentation
