Difference between revisions of "Create a plain ROM"
From MSX Game Library
(→Initial slot configuration) |
|||
| (20 intermediate revisions by the same user not shown) | |||
| Line 1: | Line 1: | ||
| − | A plain ROM is a format of binary application to be write into a ROM. | + | A '''plain ROM''' is a [[Target|format]] of binary application to be write into a ROM. |
| − | The most common use case is the creation of game cartridges. | + | The most common use case is the creation of '''game cartridges'''. |
The build tool will generate a .ROM file that can be written to an EPROM (like with a Mega Flash ROM cartridge). | The build tool will generate a .ROM file that can be written to an EPROM (like with a Mega Flash ROM cartridge). | ||
== Principles == | == Principles == | ||
| − | A plain ROM, unlike a [[Create a mapped ROM|mapped ROM]], is constructed from a single block whose parts will always be seen by the Z80 at the same address. | + | A plain ROM, unlike a [[Create a mapped ROM|mapped ROM]], is constructed from a '''single block''' whose parts will always be seen by the Z80 at the same address. |
| − | Therefore, they cannot be more than 64 KB in size (the maximum size visible to the Z80). | + | Therefore, they cannot be more than '''64 KB''' in size (the maximum size visible to the Z80). |
A program in ROM is detected by the MSX system thanks to a header located at addresses <tt>4000h</tt> or <tt>8000h</tt> but can in theory use any space between <tt>0000h</tt> and <tt>FFFFh</tt>. | A program in ROM is detected by the MSX system thanks to a header located at addresses <tt>4000h</tt> or <tt>8000h</tt> but can in theory use any space between <tt>0000h</tt> and <tt>FFFFh</tt>. | ||
Generally, a ROM uses one or more 16 KB pages (numbered from 0 to 3). Pages 1 and 2 can be used freely, but the system expects to have special content in pages 0 and 3: | Generally, a ROM uses one or more 16 KB pages (numbered from 0 to 3). Pages 1 and 2 can be used freely, but the system expects to have special content in pages 0 and 3: | ||
| Line 15: | Line 15: | ||
** Secondary slot register at address <tt>FFFFh</tt>. | ** Secondary slot register at address <tt>FFFFh</tt>. | ||
| − | MSXgl was designed to easily override the limitations of page 0 by providing BIOS-independent functionality and by providing ISR code that can install automatically | + | MSXgl was designed to easily '''override the limitations''' of page 0 by providing BIOS-independent functionality (all modules except... BIOS one) and by providing ISR code that can install automatically at <tt>0038h</tt>. |
| − | On the other hand, it is not easy to use page 3, especially because the call stack is located there. | + | On the other hand, it is not easy to use page 3, especially because the '''call stack''' is located there. |
| − | However, it is possible to write code that will copy the contents of page 3 to VRAM (or to RAM in another page for | + | However, it is possible to write code that will copy the contents of page 3 to VRAM (or to RAM in another page for MSX 2 or above). |
== Targets == | == Targets == | ||
| − | To create an plain ROM you just have to choice one of the following targets format: | + | To create an plain ROM you just have to choice one of the following targets format in your project configuration (<tt>project_config.js</tt>): |
{{:Target/Plain_ROM}} | {{:Target/Plain_ROM}} | ||
For more detail, see [[Target]] article. | For more detail, see [[Target]] article. | ||
| − | == | + | === Initial slot configuration === |
| − | + | Slot configuration when your program start according to your ROM target format; i.e. at the beginning of your <tt>main()</tt> function. | |
| − | |||
| − | |||
| − | The page file can be either in C (<tt>.c</tt>) or in assembler (<tt>.asm</tt>). | + | <img style="height:240px; margin:0.5em;" src="https://raw.githubusercontent.com/aoineko-fr/MSXgl/main/engine/doc/img/target/rom_slot_16k_p1.png" /> |
| − | Data and code are accumulated from the following | + | <img style="height:240px; margin:0.5em;" src="https://raw.githubusercontent.com/aoineko-fr/MSXgl/main/engine/doc/img/target/rom_slot_16k_p2.png" /> |
| + | <img style="height:240px; margin:0.5em;" src="https://raw.githubusercontent.com/aoineko-fr/MSXgl/main/engine/doc/img/target/rom_slot_32k.png" /> | ||
| + | <img style="height:240px; margin:0.5em;" src="https://raw.githubusercontent.com/aoineko-fr/MSXgl/main/engine/doc/img/target/rom_slot_32k_isr.png" /> | ||
| + | <img style="height:240px; margin:0.5em;" src="https://raw.githubusercontent.com/aoineko-fr/MSXgl/main/engine/doc/img/target/rom_slot_48k.png" /> | ||
| + | <img style="height:240px; margin:0.5em;" src="https://raw.githubusercontent.com/aoineko-fr/MSXgl/main/engine/doc/img/target/rom_slot_48k_isr.png" /> | ||
| + | |||
| + | == Page data and code == | ||
| + | By default, the [[Build tool]] will accumulate all your program's '''data and code''' from the ROM header address (<tt>4000h</tt>) in page 1. If the size of your data and code exceeds 16 KB, it will continue to accumulate them on the next page (page 2). | ||
| + | |||
| + | However, the Build tool also allows you to add data and code directly to any a given page of a plain ROM. | ||
| + | This is especially useful for adding data to page 0 (before the ROM header), but also if you want to organize the code and data on pages 1 and 2 separately. | ||
| + | |||
| + | To do this, you just need to add at the root of your project, a file with a postfix <tt>_pX</tt> where <tt>X</tt> is the number of the page where to place this code (0 to 3). | ||
| + | And '''that's all'''! :) | ||
| + | |||
| + | The page file can be either in '''C''' (<tt>.c</tt>) or in '''assembler''' (<tt>.asm</tt>). | ||
| + | Data and code are accumulated from the following address: | ||
* Page 0: | * Page 0: | ||
** <tt>0000h</tt> (for targets without ISR) | ** <tt>0000h</tt> (for targets without ISR) | ||
| − | ** <tt>0100h</tt> (for targets with ISR) | + | ** <tt>0100h</tt> (for targets with ISR to prevent overwrite) |
* Page 1: <tt>4000h</tt> | * Page 1: <tt>4000h</tt> | ||
* Page 2: <tt>8000h</tt> | * Page 2: <tt>8000h</tt> | ||
| Line 43: | Line 57: | ||
You can then switch to <tt>ROM_48K_ISR</tt> format in your project configuration (project_config.js) to have 16 KB more! | You can then switch to <tt>ROM_48K_ISR</tt> format in your project configuration (project_config.js) to have 16 KB more! | ||
You don't have to change anything in your program (it still starts at <tt>4000h</tt>), but you can now add data or code to page 0 by including it in a <tt>monkey_p0.c</tt> file (you can also move there data or code from the main program). | You don't have to change anything in your program (it still starts at <tt>4000h</tt>), but you can now add data or code to page 0 by including it in a <tt>monkey_p0.c</tt> file (you can also move there data or code from the main program). | ||
| + | |||
Since you are using the <tt>ROM_48K_ISR</tt> format, the build tool will automatically add the necessary interrupt handling code for the system at address <tt>0038h</tt>. | Since you are using the <tt>ROM_48K_ISR</tt> format, the build tool will automatically add the necessary interrupt handling code for the system at address <tt>0038h</tt>. | ||
As a result, all data and code contained in file <tt>monkey_p0.c</tt> will be added from address <tt>0100h</tt> (to avoid overwriting the ISR code). | As a result, all data and code contained in file <tt>monkey_p0.c</tt> will be added from address <tt>0100h</tt> (to avoid overwriting the ISR code). | ||
This way, page 0 of your cartridge will always remain selected by the system and you won't have to juggle with slots or do inter-slot reading: The content of page 0 is directly accessible between addresses <tt>0100h</tt> and <tt>3FFFh</tt>. | This way, page 0 of your cartridge will always remain selected by the system and you won't have to juggle with slots or do inter-slot reading: The content of page 0 is directly accessible between addresses <tt>0100h</tt> and <tt>3FFFh</tt>. | ||
| + | |||
All data labels or functions declared in <tt>monkey_p0.c</tt> can be used in your main program, but of course you have to provide their definitions (defined as <tt>extern</tt>). | All data labels or functions declared in <tt>monkey_p0.c</tt> can be used in your main program, but of course you have to provide their definitions (defined as <tt>extern</tt>). | ||
Latest revision as of 22:19, 28 September 2024
A plain ROM is a format of binary application to be write into a ROM. The most common use case is the creation of game cartridges. The build tool will generate a .ROM file that can be written to an EPROM (like with a Mega Flash ROM cartridge).
Principles
A plain ROM, unlike a mapped ROM, is constructed from a single block whose parts will always be seen by the Z80 at the same address. Therefore, they cannot be more than 64 KB in size (the maximum size visible to the Z80). A program in ROM is detected by the MSX system thanks to a header located at addresses 4000h or 8000h but can in theory use any space between 0000h and FFFFh. Generally, a ROM uses one or more 16 KB pages (numbered from 0 to 3). Pages 1 and 2 can be used freely, but the system expects to have special content in pages 0 and 3:
- Page 0:
- The MSX BIOS with all standard functions.
- The interrupt handling code (ISR) at address 0038h.
- Page 3:
- RAM with call stack and BIOS variables area.
- Secondary slot register at address FFFFh.
MSXgl was designed to easily override the limitations of page 0 by providing BIOS-independent functionality (all modules except... BIOS one) and by providing ISR code that can install automatically at 0038h. On the other hand, it is not easy to use page 3, especially because the call stack is located there. However, it is possible to write code that will copy the contents of page 3 to VRAM (or to RAM in another page for MSX 2 or above).
Targets
To create an plain ROM you just have to choice one of the following targets format in your project configuration (project_config.js):
| Target | Description |
|---|---|
| ROM_8K | 8 KB ROM in page 1 (4000h ~ 5FFFh) |
| ROM_8K_P2 | 8 KB ROM in page 2 (8000h ~ 9FFFh) |
| ROM_16K | 16 KB ROM in page 1 (4000h ~ 7FFFh) |
| ROM_16K_P2 | 16 KB ROM in page 2 (8000h ~ BFFFh) |
| ROM_32K | 32 KB ROM in page 1&2 (4000h ~ BFFFh) |
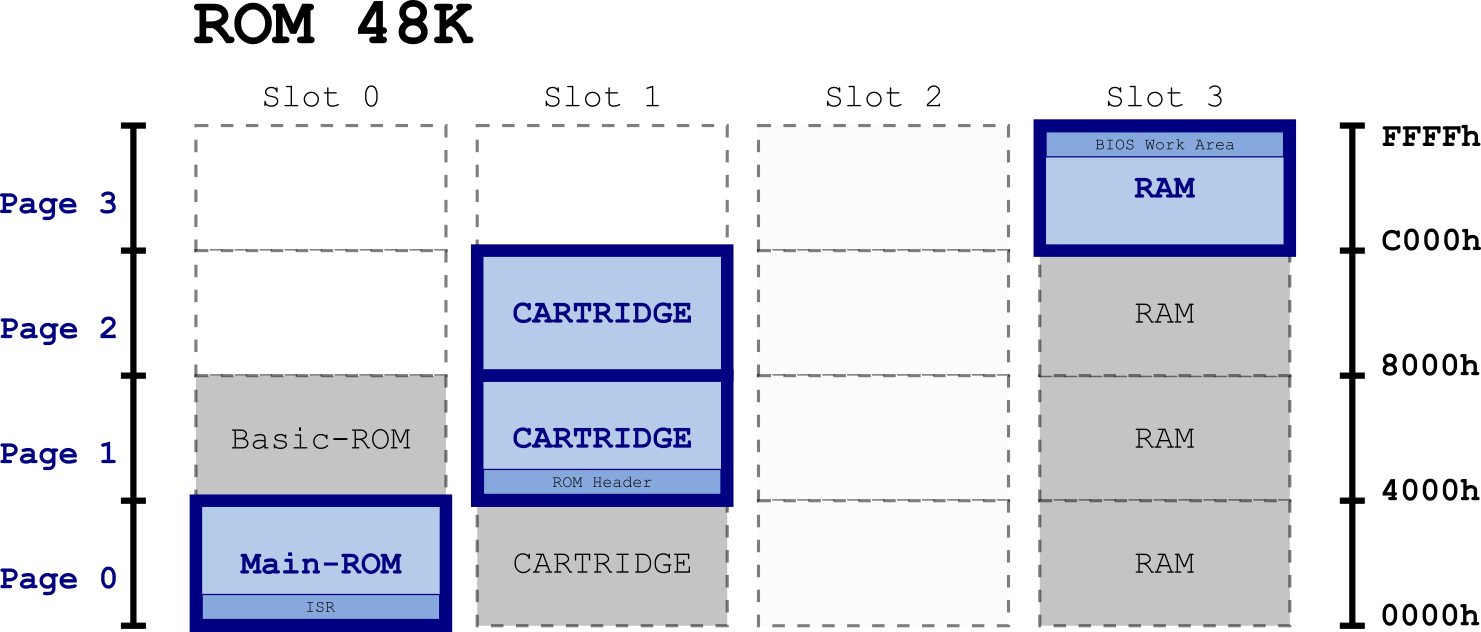
| ROM_48K | 48 KB ROM in page 0-2 (0000h ~ BFFFh) |
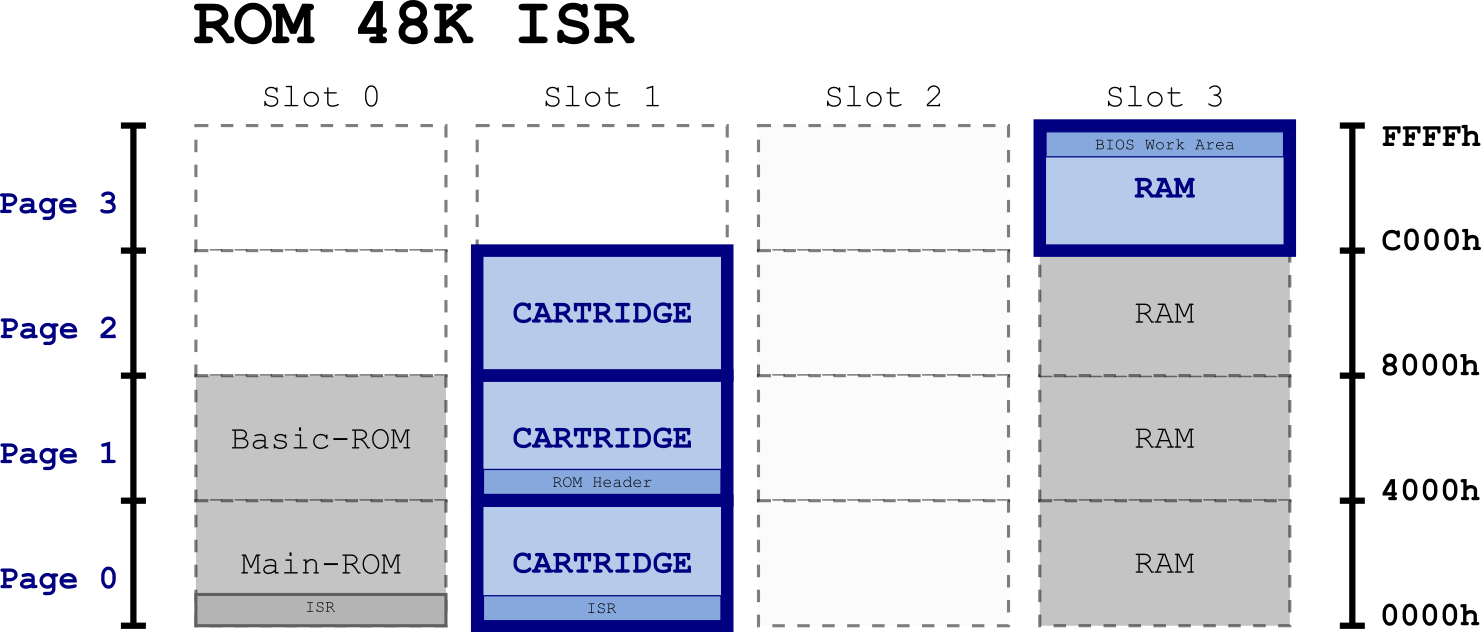
| ROM_48K_ISR | 48 KB ROM in page 0-2 (0000h ~ BFFFh) with ISR replacement |
| ROM_64K | 64 KB ROM in page 0-3 (0000h ~ FFFFh) |
| ROM_64K_ISR | 64 KB ROM in page 0-3 (0000h ~ FFFFh) with ISR replacement |
| ROM | Alias for ROM_32K |
For more detail, see Target article.
Initial slot configuration
Slot configuration when your program start according to your ROM target format; i.e. at the beginning of your main() function.
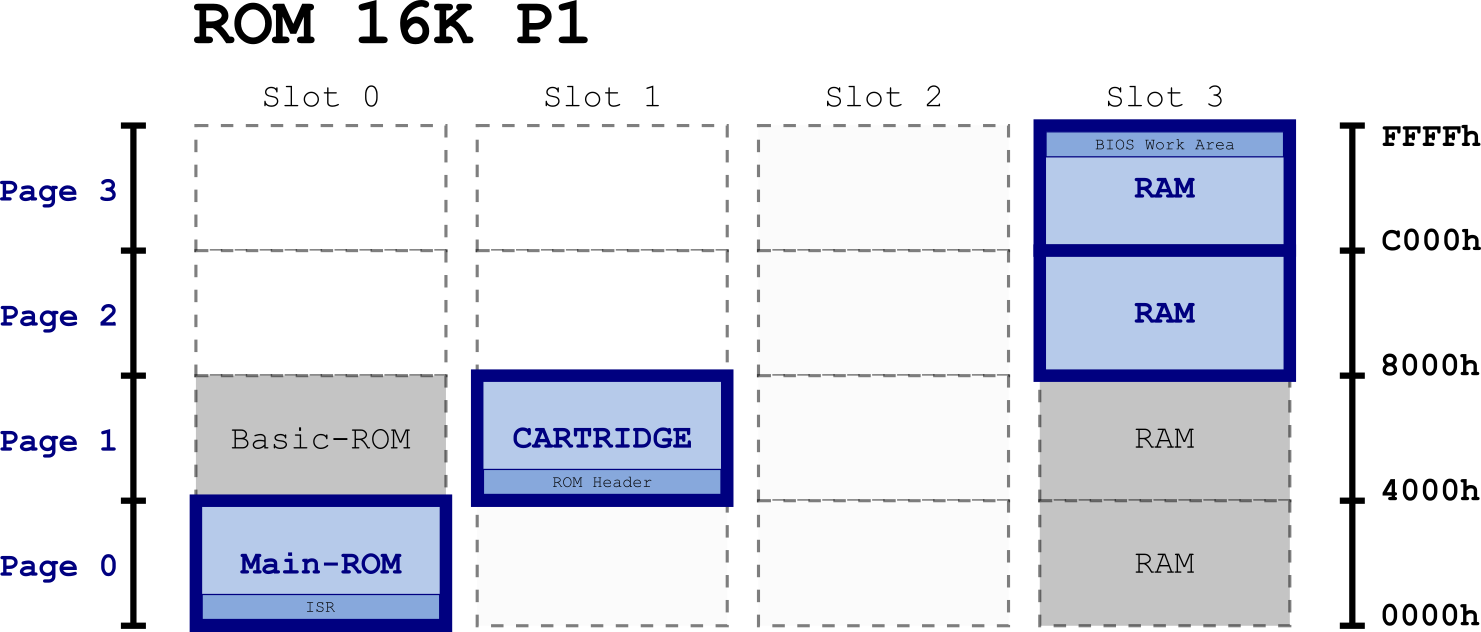
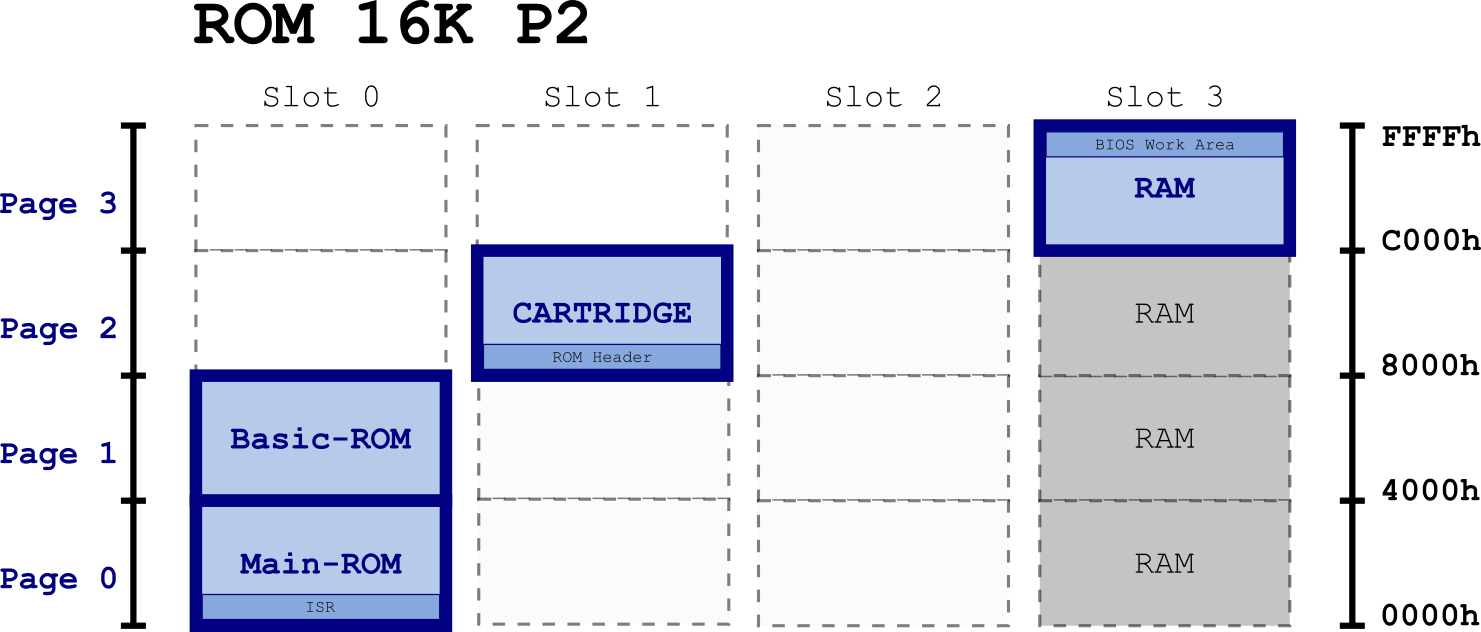
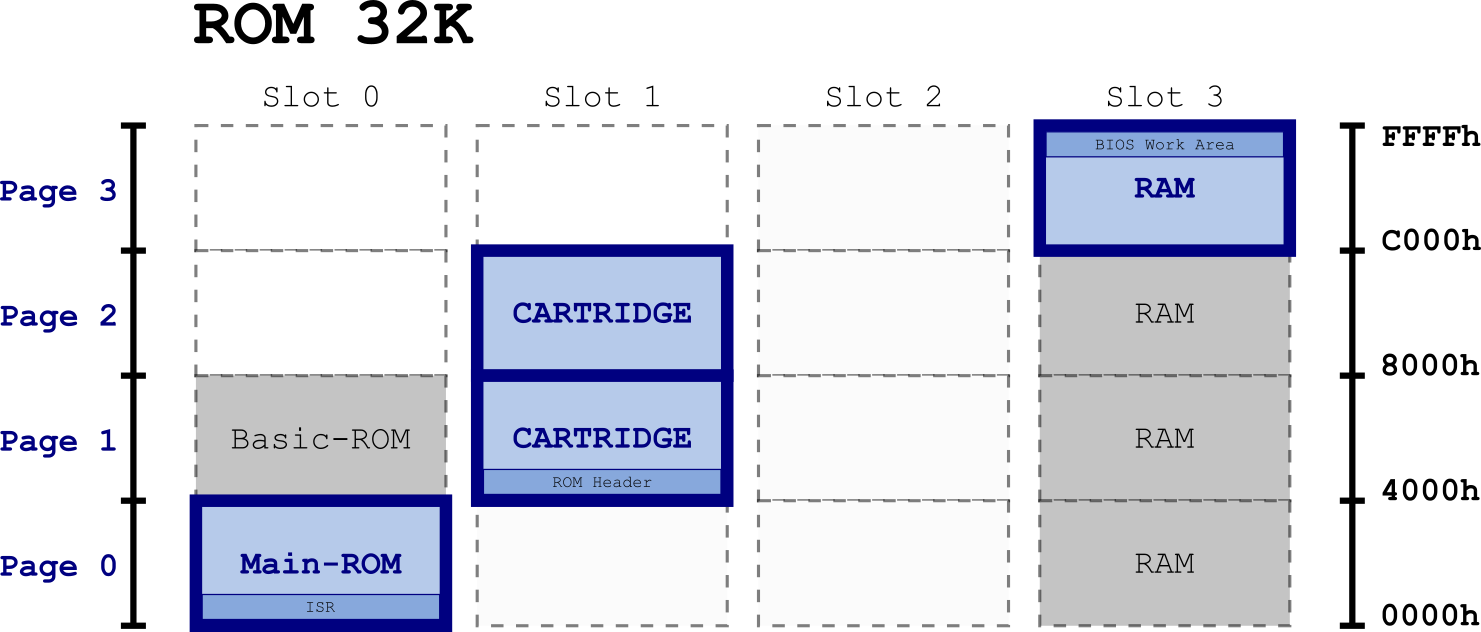
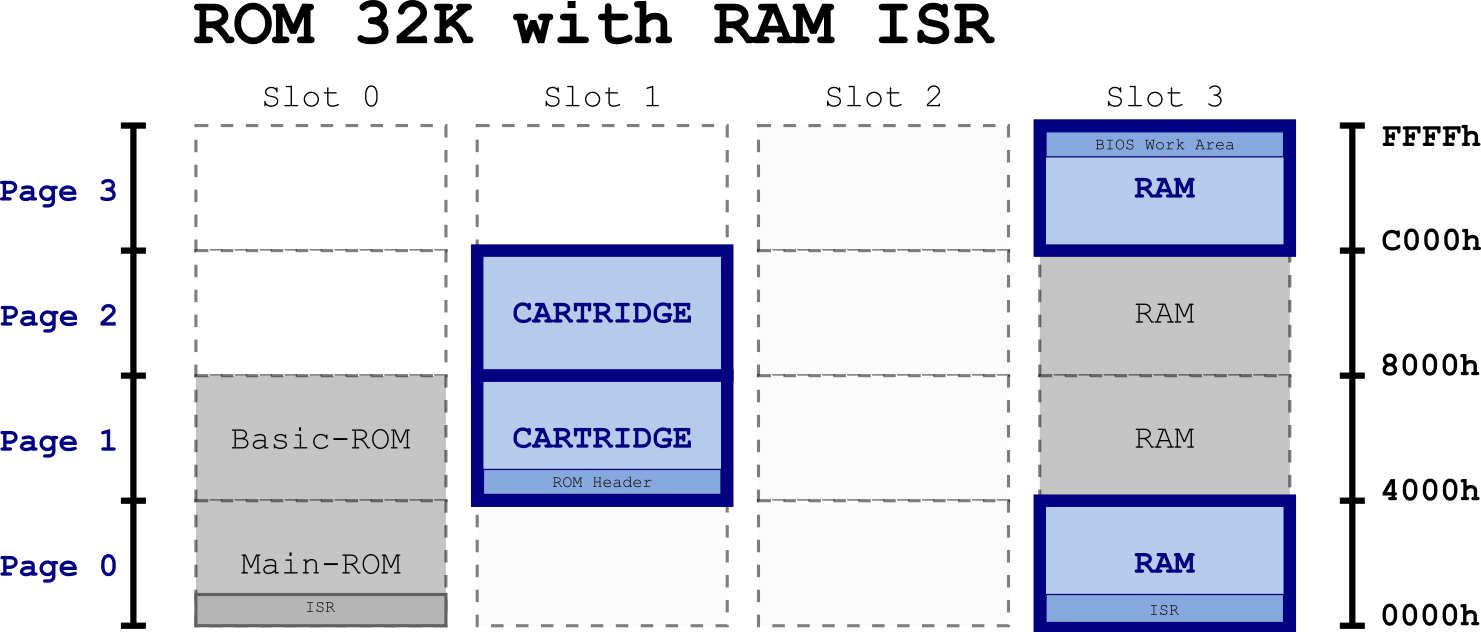
Page data and code
By default, the Build tool will accumulate all your program's data and code from the ROM header address (4000h) in page 1. If the size of your data and code exceeds 16 KB, it will continue to accumulate them on the next page (page 2).
However, the Build tool also allows you to add data and code directly to any a given page of a plain ROM. This is especially useful for adding data to page 0 (before the ROM header), but also if you want to organize the code and data on pages 1 and 2 separately.
To do this, you just need to add at the root of your project, a file with a postfix _pX where X is the number of the page where to place this code (0 to 3). And that's all! :)
The page file can be either in C (.c) or in assembler (.asm). Data and code are accumulated from the following address:
- Page 0:
- 0000h (for targets without ISR)
- 0100h (for targets with ISR to prevent overwrite)
- Page 1: 4000h
- Page 2: 8000h
- Page 3: C000h
Exemple
Let's say you have a project named Monkey with the ROM_32K target format but for which you have almost no space left. You can then switch to ROM_48K_ISR format in your project configuration (project_config.js) to have 16 KB more! You don't have to change anything in your program (it still starts at 4000h), but you can now add data or code to page 0 by including it in a monkey_p0.c file (you can also move there data or code from the main program).
Since you are using the ROM_48K_ISR format, the build tool will automatically add the necessary interrupt handling code for the system at address 0038h. As a result, all data and code contained in file monkey_p0.c will be added from address 0100h (to avoid overwriting the ISR code). This way, page 0 of your cartridge will always remain selected by the system and you won't have to juggle with slots or do inter-slot reading: The content of page 0 is directly accessible between addresses 0100h and 3FFFh.
All data labels or functions declared in monkey_p0.c can be used in your main program, but of course you have to provide their definitions (defined as extern).